MARINE SYSTEMS - BEGINNERS INFORMATION ~ WHAT YOU NEED!
Filtration
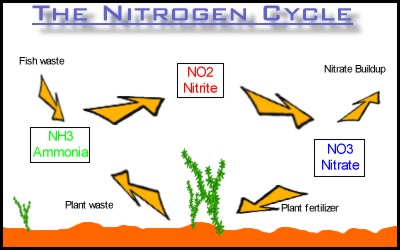
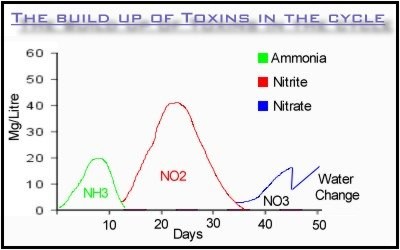
This is one of the biggest parts of the tank to get right, filtration in a marine tank should make the water so clean that you could drink it( apart from the salt--dont try this at home lol) in a freshwater tank there is a definite cycle of ammonia-nitrite-nitrate, but in a marine tank we are able to go another step and process nitrate to its gas form, by using anaerobic bacteria and understanding what conditions this bacteria need to thrive will result in a virtually nitrate free system and its completely natural.
There are many styles of filtration, here are the most common.
under gravel filtration.
Almost all of us are familiar with u/g plates etc and we all know how they work, i used one in my freshwater tank for 6 years with no problems, in a marine tank they do work but require more maintenance than normal..which due to human nature is sometimes missed, water quality starts to spiral downwards and as we all know only bad things happen quickly.
Reverse flow u/g filters work a little better and tend not to gunk up too much, the sand bed must still be kept well stirred to stop clumping etc for the normal amm-nitri-nitrate cycle the u/g filter does well, but sadly its not capable of cycling the nitrate due to the high prescence of oxygen.
Deep Sand Beds
i wont write much on dsb's as i have a excellent article that explains it 1000 times better than i could ever cover.
just to say that they are a very efficient way to cycle nitrate and to some level phosphate, and release trace elements back into the system through passive diffusion.
Berlin System
The berlin system is what most people tent to opt for, its the use of a skimmer and live rock to perform most if not all of the tanks filtration needs, a concentration of 1-2lbs of live rock is needed, and a good skimmer, after that there is no real need to purchase expensive external filters.
The live rock will cycle a tank and carry out all stages of filtration, the only thing that's really needed to make the berlin system work well is flow, water needs to be pushed through the rocks in order for the bacteria to have access to it, it also lends itself to be combined with a deep sand bed for total coverage from all angles.
This author uses the berlin method on his tank and i have had a problem with nitrate..the problem is im needing to add it!! my algae/coral zooanthelle require about 2ppm nitrate to live and function so i have started to add more liquid food simply for the nitrate content...
Jaubert Style
The jaubert style of filtration uses a thick layer of live sand on top of a plenum to provide a small void under the sand, this does a roughly similar job as the deep sand bed, encouraging anoxic conditions to be developed, anaerobic bacteria flourishes and nitrate is cycled at quite a fast rate
plenums have sometimes caused a few raised eyebrows from some of the more experienced keepers, its low on maintenance but may need replacing every 8-12 years..i personally wouldn't ant to rip out a 12 year old reef to repair a plenum... but others swear by them..
Cleanup Crew
The clean up crew does exactly what it says on the tin. they are there to eat any waste food and keep the tank clean, plus they will happily eat the waste of other larger animals thus removing it from the water column and minimizing waste a real boon in keeping manual maintenance to a minimum and eradicating algae blooms that are fed by excessive waste, they can come in all shapes and sizes, from starfish to snails and hermits being the most common, most people buy the usual turbo snails etc but also try to look out for the more unusual like cerith snails and Nassarius Snails, these little beauties will not only eat wasted food and detritus, but they like to burrow into the sand and are excellent in keeping d.s.b's healthy and well turned over. a real treasure if you can get hold of them.
Hermit crabs are comical with blue legs being a little better at cleaning up algae than reds but both are equally useful in keeping the tank maintained and clean, other than cleaning the front glass every few weeks there should be no real human intervention, your cleanup crew will do it all for you if in sufficient numbers... which leads nicely to clean up crew stocking, general rules tend to vary but try to aim for 1 clean up species per 1-3 gallons of water and 1 starfish per 50 gallons or so.
A quick word of warning about mixing snails and hermits, if the tank becomes very clean ahd the hermits get hungry they will opt for a nice snail takeaway so every few weeks feed them with a small piece of meaty food, such as mussel or lance fish to keep them happy, plus ask your lfs for a few empty shells so they wont also kill snails to steal shells as they grow.
Sumps
A sump is a smaller tank either kept to the side or the bottom of the main tank, it allows a area to put all of the less attractive equipment such as heaters/skimmers etc etc out of sight, and also if enclosed in a cabinet it reduces noise.
the main tank usually has to be drilled in the base with overflow weirs or at the sides/back at the required water line to accept pipes that will lead to the sump, the sump itself can be just a box or it can be partitioned to allow a area for growing algae's to compete for nutrients or if lighting is sufficient a area that baby corals can be grown on in relative safety from fish etc.
The main reason for the sump however is it increases the gallonage of the system, allowing you to have more fish in the main display without being overstocked.
a return pump is then used to return the water to the tank as required
refugiums, i thought id tack this 1 onto sumps cos that are somewhat linked, a refugium is a small area that is safe from fish/inverts etc that will eat them, it can be as simple as a box under some small rocks made of eggcrate, or as complex as a separate tank full of algae that allows them to breed and be safe, they will swim into the tank in a few days and be eaten as they do, but their numbers will always be high if well fed, they are the best live food available so if space allows a refugium is a excellent idea
When things go wrong
Ok this isn't a totally risk free hobby, things do go awry and mistakes happen, short of a tank rupture things usually can be recovered in time.
some general things that tend to happen are things like poor water maintenance, not maintaining equipment or overfeeding usually are the root cause to much heartache.
water maintenance:
your water is the life of the tank, if its goo then you can almost bet that everything else will also be good, if its bad then your in for a rough time, in a new tank test every 3 days for main water parameters, including ammonia, nitrite, nitrate, ph and specific gravity( s/g).. as the tank ages you can drop ammonia and nitrite from the list.
Testing the water. most tests can be done at any time, ph should be done just before the lights come on and just before they turn off at the end of the day, as photosynthesis will raise ph ( also see algae control for methods in controlling ph swings)and knowing what the tanks swing is can be very useful, the ph can drop if the tank is becoming acidic, fish waste is acid based likewise so is the co2 they produce, good surface movement will help these gas off naturally and is a main reason why tight fitting cover glasses aren't used.
water tests are the backbone to finding out what may be wrong, many times people say "i have lost my fish" and i reply what are your test results? usually the reply is " umm i don't know" if something looks ill, the tank looks different, the corals or fish are acting strange or not showing that well you test test test!!!
Algae is a main reason for heartache in the tank, it can plague tanks for many years, usually if they keeper is using tap water with residual nitrates or there is phosphate present in the water then algae can last forever.
Getting rid of algae
Most people overfeed, resulting in excessive waste and bad water, just cutting down on feeding can solve many problems, incorrect lighting or bulbs that are a few years old will also feed enormous algae blooms as the light spectrum shifts to the redder end algae will thrive.
Increase the clean up crew, make them scavenge for those leftovers that are missed and improve water quality, make sure all filters/skimmers are working well, some may need a clean out or a rinse in tank water.
manual vacuuming of the substrate shouldn't be needed, that's the job of the clean up crew.
Algae blooms in one area of the tank would denote that something has died in that area, releasing nutrients into the water and causing a local bloom, sadly that the time to start looking under rocks to see what the unfortunate victim is and remove it if possible.
valonia is a bubble algae that some suffer from ( myself included) small porcelain crabs will eat it, but its best not to introduce it if possible, if you purchase anything from a lfs that has small green bubbles of algae on it remove them outside the tank before introduction.
Slime algae. this usually plagues new tanks and new keepers, its a mat forming red/greed algae that smothers everything in a new tank, usually it will go away as it consumes whatever is feeding it, but sometimes its persistent, 1 golden rule is slime algae hates flow, if you have it increase flow to the whole tank as well as the general area, it will peel off the substrate in mats and can be easily netted out of the tank once loose. it is one of the few algae's that is poisonous to both fish and humans, if you have been handling cyno or any slime algae wash you hands well afterwards.
All nusciance algae's will go away if whatever is feeding them disappears, you can also cut down on light and introduce competition for those nutrients in the form of macro algae's, carlurpra is the most common algae that people use, usually in the sump( as it can become a pain) a small light on the sump will be enough to grow this algae and because its such a fast grower it will soon out compete any other algae for food, plus it gives the added benefit that if its lit in the sump at night when the main tank lights are off it will stabilize the tanks ph balance and stop really bad swings in ph during the nighttime a double plus!!!
Disease.
White spot (Cryptocaryon irritans)
white spot is one of the most common ailments that will strike marine fish, in a marine system if the fish cannot be netted and placed ina hospital tank then its very hard to treat, as most medications contain copper which not only is toxic to all inverts it is also absorbed into the rock and re-released over long periods of time.
One of the best methods i have found to not only treat ich but also prevent it is the common clove of garlic, it contains a compound called Allicin, this compound produces the smell we all know as garlic, its highly antibiotic and will also stimulate feeding in lethargic fish, you can use it by taking 1 clove of garlic and after peeling stab all over with a fork, let the clove sit with the food in some water for a good hour then remove it and feed as normal, or for a more powerful punch take a small piece ( baby fingernail size) and pound it into a fine pulp, the more the garilc is minced/liquidized the more allicin is released in the garlic oils, this canthen be fed to the fish in the same way as above but you don't need to remove the small pieces of garlic, most fish will eat them with relish. it has proven to be such a boon that kent now manufacture a product called garlic extreme which is just a liquidized garlic preparation.
Velvet/rust (Amyloodinium ocellatum)
This is a not so common parasite that presents itself as a golden/rusty sheen on the gills and scales of a infected fish, if left untreated it is usually fatal, infected fish will either die for no reason or if seen early they will flick against rocks and also cough to flush water over their gills.
Treatment includes freshwater dips( very stressful and can cause ich) or chemical control in a isolated hospital tank
Lateral line disease
This problem condition affects certain species of marine fish, and those almost entirely members of the family Acanthuridae, Surgeon fish or Tangs. The appearance of the resulting damage from the disease is very similar to that of the Hole in the Head Disease seen in freshwater fish. But in Marine fish it will usually start off around the head area, and progress along the lateral line of the fish back into the body, scarring the fish as it develops. Neglect to feed the necessary elements of the food given to Surgeon fish is the primary cause of this condition, and only restoration of an improved feeding regime will allow it to control, and repair. The cure for this condition is not the complete answer, the feeding routine must also be addressed as tangs have a very selective stomach and cannot tolerate algae free environments.
Osmotic shock.
Most fish regulate how "wet" their bodies are through active osmosis, this basically means that they have the ability to pump water in or out of their bodies to match their current conditions, most oceans are very similar in levels of salinity, so normally this isn't a problem.
The problem starts when we as keepers neglect to inform ourselves of the chemical composition of our tanks, the salinity, ph and hardness all play important roles, this form of infection usually presents itself if a fish/invert is placed in a bag at a lfs, then carefully transported home, the keeper then opens the bag and dumps the poor fish into the tank, the difference in ph and salinity between the 2 tanks may not be significant, but it usually is enough to make the fish pump out so much internal water (in a attempt to become more salty)that it dies of dehydration( this would happen if your salinity was higher than the lfs) or the opposite if the salinity is lower than the lfs the fish would start to suck in water to become "less salty" and match its environment, this usually causes internal haemmoraging and renal failure resulting in a slow and very painful death.
inverts are especially prone to osmotic shock due the the hard exoskelleton which means that water takes much longer to diffuse inside its body.
what can you do to prevent it??
This is the easy part.. try to match your lfs water parameters if possible, make your tanks salinity,ph and hardness as close to theirs as you can to mimise shock, and always acclimatize well, float a bag with a new fish in for a few hours, adding 10mls or so of tank water to the bag every 10-15mins so the animal/invert/coral slowly becomes used to the new water chemistry, this may take a few hours of hassle, but it reduces almost all chances of shock, and stress induced disease like ich.
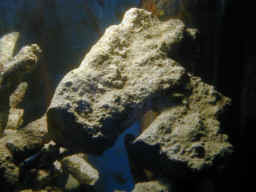 This is florida base rock -
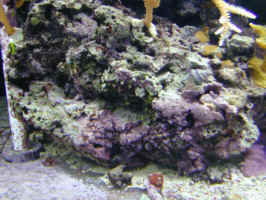
 Eco System Rock